{from} round two vintage
Friday, December 24
Wednesday, December 22
Christmas Wish List
So if I were to send a list to Santa this year these would definitely be on it! However, we all should know by now that Santa is not real and I won't be getting all of these things this Christmas, but a girl can only dream, right??

this bedding. I have been lusting over this bedroom since
I posted it here.
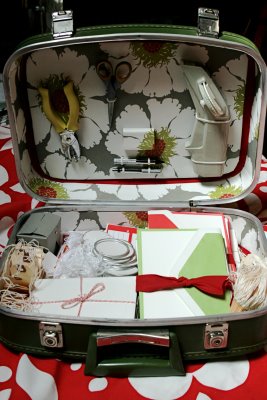
this fantabulous bag from Pure and Noble Etsy shop
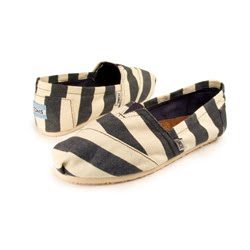
Gray and White Stripey Toms
Diana Mini Camera

this bedding. I have been lusting over this bedroom since
I posted it here.
Keurig Coffee Maker.
ok i know i know...they are kinda wasteful but that doesnt change
the fact that this would be so much faster, easier and cleaner when
I make my coffee every morning...and I'm the only one that drinks
it and I tend to make way too much coffee and end up wasting it...
I can justify it, right?
magnetic kitchen timer from anthro
What's on your Christmas wish list this year?
Monday, December 20
His & Hers
My friend Brooke at Pure and Noble and her friend Alli at Hooray started a special His & Hers post every monday. They have invited their readers to play along so now every monday I'll be giving you a little dose of His & Hers. Don't forget to check out Brooke and Ally's posts today too! And if you have a blog, you should play along too!! You know we all need something to look forward to on Mondays!
 Oh the joy of old school Christmas photos!! yes this is actually Tom on the left and me and my sister on the right. {I'm the little one}. I just have to ask, Mom, why the bonnets?
Have a Happy Monday! Just thought I should let you know...5 more days til Christmas! and I still have A LOT to accomplish! What about you??

Have a Happy Monday! Just thought I should let you know...5 more days til Christmas! and I still have A LOT to accomplish! What about you??
Friday, December 17
Homemade Christmas: Feelin' Feltastic!
Wow! 5 finals in 4 days. I forgot what this felt like! staying up too late, eating like crap, getting 4 hours of sleep and surviving off of 5 hour engergy shots and espresso. im too old for this! but its over now, until next semester. so I'm feelin good right about now! Now I can focus more on Christmas, my gift for the Hubs, and the blog!
As promised here are a couple more crafts I have done for my Homemade Christmas theme, with felt...of course!
1. Garland:
I just started folding felt circles into quarters and threading them a few weeks ago just to experiment. {I know...I'm weird like that} and after awhile it looked like this:
so I decided to keep it up and make garland for our ginormous Christmas tree that's too big for our house! and yes, it did take a long time but this took up my whole Thanksgiving break and was a great way to procrastinate on my school work!
Here's the final result!
2. Napkin Rings:
These are so easy to do..that's what I love about felt! I just simply made a flower {There are so many tutorials on the web for felt flowers but here's how I made mine: First, I cut a circle out of felt. Then starting from the outside of the circle, I cut in a spiral to the center. To shape the flower you just hold the center and coil it and glue!} Next, I glued on the leaves and used hot glue to adhere it to craft wire...(found in the floral section of Joanns). Then I wrapped the wire around the napkin and BAM! you have a festive touch to your table setting!

I also made a couple with holly leaves. I used these styrofoam itsy-BEADsies for the berries and the center of the flower. I love these things! And the napkins are just plaid fabric I found at Hobby Lobby cut into napkin size squares.
As promised here are a couple more crafts I have done for my Homemade Christmas theme, with felt...of course!
1. Garland:
I just started folding felt circles into quarters and threading them a few weeks ago just to experiment. {I know...I'm weird like that} and after awhile it looked like this:
Here's the final result!
2. Napkin Rings:

I also made a couple with holly leaves. I used these styrofoam itsy-BEADsies for the berries and the center of the flower. I love these things! And the napkins are just plaid fabric I found at Hobby Lobby cut into napkin size squares.
Here's my table rockin' and ready for Christmas!
For the centerpiece I used a glass parfait I found at a thrift store, filled it with moss and added some candles. I threw in some of the itsy-BEADsies and some iron leaves (have no idea where these came from but I love them!) The red plaid is just more fabric from HL and I added some wine corks for natural color. I simply used a scarf for the table runner. I love the natural look mixed with different Christmas plaids! It makes my heart feel all warm and cozy!! And I want to cuddle up with a blanket and drink apple cider by the fire and listen to Amy Grant Tennessee Christmas...is that weird?
What Christmas decks in your house make your heart feel cozy?! Does anything make you want to listen to Amy Grant? yea, probably not...
Monday, December 13
Around the House: Christmas Cards
It's the most wonderful time of the year! The time when you get a lot of real mail! And you feel oh so loved! But what do you do with all the cards and photographs? Yes, eventually they'll end up in my card holder you may have heard about from this post, but until mid january, they go on display. So here are a few creative and decorative ways to show off how loved you are!
the clothes line...
ribbon over the door...
bulletin board...
the fridge...
the clothes line...
ribbon over the door...
bulletin board...
 |
| via mommy amour |
along the banister...
 |
| via Martha Stewart |
 |
| via not quite vintage |
the card wreath using an embroidery hoop...I might try this one!
 |
| via Martha Stewart |
the christmas card tree...
 |
| via Country Living |
How are you displaying your christmas cards this year? any new ideas you'd like to share?
Friday, December 10
Oops!
If you happened to read my post this morning before 11:30 on the Table Top Christmas Trees, you were probably a little confused. Somehow part of my tutorial was cut and pasted at the end of the post. Notice I posted this at 3:16 this morning and a lot of things can go wrong that early (or late) in the morning. anyways, it's fixed now!
Homemade Christmas: Tabletop Trees

Now you all know I'm super cheap and I couldnt let myself spend 4,5 and 6 dollars on styrofoam trees since money's a little tight right now... so I made mine out of red poster board. a little ghetto, yes, but you can't tell once they are covered.
so if you are cheap like me and want to use posterboard, here's how you do it:(and it will only cost you about $1) First, I cut the poster board horizontally into three different strips for my three trees: small, medium and large...1/4 for the small, 1/4 for the medium and 1/2 of the board for the largest tree. I shaped each strip into a tight cone and used a glue gun to bond it. Next, I measured from the top to bottom how tall i wanted each tree and made markings around the bottom and cut evenly around it. (my tallest tree was 16", the medium one was 13" and the smallest was around 11 or 12").
OR
you could go buy different size styrofoam cones from a craft store...easy enough! but this option will cost you more like $15.
Now for the fun part: decorating your trees! you could use, moss, paper, beads, ribbon, sequins, yarn, felt, twigs, candy...whatever! For the small tree I used some plaid paper from Paper Source I had left over from a different project. I cut about 2" horizontal strips from the paper to fit around the cone. I fringed the edges of the strips and glued them around the tree starting at the bottom. The width of the strips got smaller as I moved up the tree.


For the medium tree, i simply wrapped it in fuzzy white yarn (so soft you could snuggle with it). This one is my favorite bc it's so wintery and cozy looking and it was for sure the easiest. I just glued the end of the yarn at the bottom of the tree and wrapped it all messy and then glued the other end when i was finished.

For the largest tree I I used red felt. Kinda like the small tree I cut strips to fit around the cone but instead of fringing them I scalloped the edges. It turned out a lot better than I thought it would!
And here they are together (sorry the picture's kinda fuzzy, but I was trying not to use the flash):

And, I loved the white fuzzy yarn so much that I had to make another yearn wreath...or wreaths! overkill? maybe, but who cares! it's Homemade Christmas! and this one is for the front door!

Have a wonderful friday! Enjoy your weekend!!!
Wednesday, December 8
The Gift that Keeps on Giving...Litterally
 |
| photo via legacymissions.org |
I met HOPE in 2006 on a trip to Zambia with Family Legacy Missions. (My sweet sister in law, Holly, works for the ministry and essentially helped make it into what it is today!) Hope is the most beautiful, sweet spirited, and joyful girl! I have a special connection with her and an amazing story, but I'll have to save that for another time.
For Christmas 2008, I gave Tom the gift of a sponsored child. I had never met GIFT but I learned that he had a lot of sister's and always wanted a brother. Since Tom has three sisters and always wanted a brother as well and since his name was "Gift," I just had to pick him out! We received letters from Gift and he had never even met us. The next summer we had the opportunity to go to Zambia and meet him, and I'm not kidding when I say he is the sweetest, happiest kid I have ever met!
 |
| photo via legacymissions.org |
AZIZI has a really tragic story. He kinda fell in love with Tom while we were there. Family Legacy was working on getting him out of his abusive home and into the Tree of Life Children's Village. We just had to make it happen so we decided to sponsor him. He writes Tom letters all the time and says the cutest things! You can watch a video on this page about his story and others like him. My point is not to tell you that we sponsor kids, but to share some perspective other than what we normally see on our daily blog routine. Sooooo....as your thinking of Christmas gifts, just throwing it out there that you can give a sponsored child! There are all different levels of sponsorship through Family Legacy and so many kids to choose from that need help. You can also give a one time gift donation and send a child to the annual Christmas Party. You can find out how to sponsor a child here.
Kinda puts things into perspective doesn't it? I dont know about you but I get so wrapped up in myself and petty things of this world sometimes I forget what my life is really for... to serve God and love others. Why do I need a constant reminder of this?! This week I'm challenging myself...and you...to take a step back from the routine of life and focus your energy on something of more significance...whatever that may be for you.
oh yea! and if you have any questions about Family Legacy or if you're interested in going, supporting or even volunteering in the local office leave a comment or email me at laurenscurry@gmail.com
Monday, December 6
Vintage Love: Suitcases
I'm kinda lovin' the vintage suitcase lately! And It doesn't take much to see why:
Colorful flair...
| source unkown |
stacked up for a side table...
or on legs...
 |
| via IkeaHackers |
 |
| via Vintage Renessiance |
keep your crafts organized...
 |
| via craftgossip.com |
| via ahiparagirl |
| via superherodesigns.com |
Stylish storage...
Travel...
Practical pockets...
| via youroldshoes |
Subscribe to:
Comments (Atom)


